Installing grab bars in your shower is one of the most important steps you can take to improve bathroom safety—especially for seniors, individuals with limited mobility, or anyone wanting to prevent slips and falls. But simply having grab bars isn’t enough; knowing where to place them is key to getting the most benefit from their use.
In this post, we’ll cover the best locations for grab bars in a shower, why placement matters, key measurements to keep in mind, and how Five Star Bath Solutions ensures each installation is customized to meet your needs and bathroom layout.
Why Grab Bar Placement Matters
Grab bars serve one main purpose: to provide support and stability as you move through a potentially slippery environment. The wrong placement can lead to awkward body mechanics, reduced effectiveness, and even injury. Properly placed grab bars, on the other hand, make daily bathing safer, easier, and more accessible.
The right placement depends on:
- Your mobility and needs
- The size and layout of your shower
- Whether you have a tub-shower combo or walk-in shower
- How often you sit while bathing (e.g., using a shower seat)
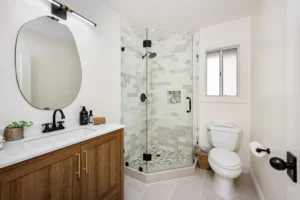
The Three Main Locations for Shower Grab Bars
While grab bars can technically be placed anywhere that provides support, the most effective placements fall into three main categories:
1. Vertical Grab Bar Near the Entrance
Purpose: Stability while entering or exiting the shower.
- Recommended location: Just outside or inside the shower entrance, mounted vertically on the wall closest to the shower door or curtain.
- Why it matters: It offers a sturdy grip as you step in or out, minimizing the risk of slipping during that transition.
- Typical length: 18 to 24 inches.
- Mounting height: The bottom of the bar should be around 36 to 40 inches from the floor.
This is especially useful in walk-in showers and is often the first grab bar people reach for when entering.
2. Horizontal Grab Bar Along the Back Wall
Purpose: Support while standing or turning in the shower.
- Recommended location: On the long wall of the shower, mounted horizontally.
- Why it matters: It provides support while standing, washing, or turning. If someone loses balance, this bar offers the most reliable, natural support.
- Typical length: 24 to 48 inches, depending on shower width.
- Mounting height: Around 33 to 36 inches from the floor (standard ADA recommendation).
This is considered the most versatile and essential grab bar for most users.
3. Diagonal Grab Bar Near the Faucet/Controls
Purpose: Support while adjusting water temperature or entering a seated position.
- Recommended location: On the side wall near the faucet and controls.
- Why it matters: A diagonal grab bar offers a natural hand angle and is easier to grip for those with limited strength. It also helps with lowering to or rising from a shower seat.
- Typical angle: Mounted at a 45-degree angle, starting roughly 34 inches above the floor and rising to 42 inches.
It’s especially helpful for those using a bench or shower chair and who need assistance transitioning.
Additional Placement Tips for Specific Shower Types
For Walk-In Showers:
- Install two to three bars: one vertical at the entrance, one horizontal along the back wall, and one diagonal near the shower controls.
- If using a shower seat, consider a horizontal bar 6 to 10 inches above seat height for support while seated.
For Tub-Shower Combos:
- Install a vertical bar at the tub entry for getting in/out.
- Place a horizontal bar along the long wall above the tub rim for stability.
- Consider a smaller diagonal bar at the faucet end for lowering into or rising from the tub.
ADA Guidelines vs. Personal Needs
While the Americans with Disabilities Act (ADA) provides a baseline for grab bar placement (especially in public or commercial spaces), residential installations can and should be personalized.
ADA General Guidelines:
- Grab bars must withstand at least 250 lbs. of force.
- Mounted 33–36 inches above the finished floor.
- Diameter of 1.25 to 1.5 inches for easy grip.
But at Five Star Bath Solutions, we go beyond ADA recommendations by:
- Evaluating individual height, reach, and mobility needs
- Factoring in shower design and obstructions
- Customizing bar type: straight, curved, textured, or fold-down
Common Mistakes to Avoid
When installing grab bars, avoid the following:
- Placing them too high or too low – This makes them hard to reach or ineffective.
- Attaching to drywall without reinforcement – Always secure grab bars into wall studs or with proper anchoring systems.
- Using towel bars as grab bars – Towel bars are not load-bearing and can be dangerous if used for support.
- Not accounting for future needs – Even if you’re mobile now, aging-in-place planning is a smart move.
Why Choose Five Star Bath Solutions for Grab Bar Installation?
Grab bars may seem like a simple addition, but poor installation can lead to serious risks. At Five Star Bath Solutions, we’ve helped countless homeowners throughout Central New Jersey—including areas like Basking Ridge, Hamilton, and Mt Laurel—design showers that combine accessibility with style.
We offer:
- Customized bar placement for each client’s height and mobility
- Stylish grab bar options that match your bathroom décor
- Installation as part of full shower conversions, walk-in tubs, or bathroom remodels
- Fast, clean, professional service with a focus on safety
Final Thoughts
Installing grab bars in your shower is a smart, proactive decision—but getting the placement right is just as important as having them at all. The best grab bar location depends on your shower layout, your mobility, and how you use the space daily.
Whether you’re planning a full remodel or just want to make your shower safer, Five Star Bath Solutions is here to help. Our experienced team serves NJ with expert advice, quality products, and professional installation—so you can bathe with confidence.