Remodeling a bathroom for accessibility is an important investment for homeowners who want to enhance safety, comfort, and independence. Whether you’re planning for a senior-friendly bathroom, accommodating mobility challenges, or simply making your space future-proof, an accessible bathroom can transform your daily life.
This guide walks you through the entire accessible bathroom remodeling process, from planning and design to installation and final touches, helping Central New Jersey homeowners understand what to expect.
Why Remodel a Bathroom for Accessibility?
Bathrooms are one of the most accident-prone areas in a home. Slips, trips, and falls can result in serious injuries, especially for seniors or individuals with mobility limitations. Remodeling your bathroom for accessibility helps:
- Reduce the risk of falls: Low-threshold showers, grab bars, and non-slip surfaces increase safety.
- Increase independence: Homeowners can use the bathroom without assistance.
- Modernize your space: Upgrades improve style, functionality, and comfort.
- Future-proof your home: Accessible bathrooms remain functional as needs change over time.
- Boost resale value: Homes with safe, modern bathrooms appeal to a wider range of buyers.
Understanding the remodeling process ensures your project is safe, efficient, and tailored to your needs.
Step 1: Planning and Assessment
The first step in any accessible bathroom remodel is careful planning. This stage involves evaluating your current bathroom, identifying needs, and determining the best layout and features.
Key Considerations:
- User Needs: Consider mobility, balance, and any medical requirements.
- Bathroom Layout: Measure your bathroom and determine how much space is available.
- Existing Fixtures: Identify which fixtures need to be replaced or upgraded.
- Budget: Determine your budget and prioritize essential features like safety over aesthetics if necessary.
- Accessibility Features: Common features include walk-in showers, grab bars, built-in seating, handheld showerheads, and non-slip flooring.
This planning phase sets the foundation for a smooth remodel and ensures all safety needs are met.
Step 2: Design and Selection
Once you’ve assessed your bathroom, the next step is designing the layout and selecting materials.
Layout Design:
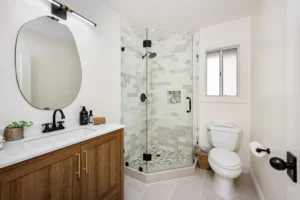
- Walk-In Showers: Ideal for wheelchair access or limited mobility.
- Low-Threshold Tubs: Perfect for seniors who occasionally enjoy a bath.
- Barrier-Free Showers: Provide seamless access with no step or ledge.
Material Selection:
- Acrylic or Fiberglass Units: Lightweight, easy to install, and low-maintenance.
- Tile: Offers a stylish, durable finish, but requires non-slip surfaces for safety.
- Stone or Engineered Materials: Luxurious and long-lasting, but may require professional installation.
Accessibility Features:
- Grab Bars: Placed strategically to assist with entering, exiting, and standing.
- Built-In Seating: Provides comfort during showers and reduces fatigue.
- Handheld Showerheads: Adjustable and convenient from a seated or standing position.
- Non-Slip Flooring: Textured tiles or acrylic surfaces help prevent slips.
A well-designed accessible bathroom balances safety, style, and functionality.
Step 3: Permitting and Code Considerations
In New Jersey, many accessible bathroom upgrades do not require permits if they are like-for-like replacements, such as:
- Tub-to-tub conversions
- Shower-to-shower replacements
- Tub-to-shower conversions
- Tub-to-walk-in tub conversions
- Any like-for-like drain work (no drain relocation)
However, permits are required if the drain location changes, or if plumbing, electrical, or structural work exceeds local code limits. Always consult with a licensed contractor to ensure compliance with state and local regulations.
Step 4: Demolition and Prep Work
Once the design is finalized and permits (if necessary) are obtained, the remodel begins with demolition and preparation.
Steps in Demolition:
- Remove existing tubs, showers, vanities, and fixtures
- Strip walls and flooring as needed
- Inspect plumbing, electrical, and subfloor for damage or updates
Prep Work:
- Repair or reinforce the subfloor
- Install moisture-resistant backer boards for walls and shower areas
- Ensure proper waterproofing to prevent leaks and mold
A clean, well-prepared space is critical for a safe and efficient installation.
Step 5: Plumbing and Electrical Updates
Accessible bathrooms often require adjustments to plumbing and electrical systems. Even if you’re keeping the same drain location, contractors may need to:
- Relocate shower controls to an easily reachable height
- Install new water supply lines for handheld showerheads or walk-in tubs
- Adjust lighting for optimal visibility and safety
- Ensure GFCI outlets are properly installed for safety
Professional installation at this stage ensures compliance with codes and prevents future problems.
Step 6: Installing Accessible Features
This is the stage where your accessible bathroom starts taking shape. Installation varies depending on the type of unit chosen:
Walk-In or Barrier-Free Shower Installation:
- Fit shower base or pre-fabricated unit
- Install walls or panels
- Add grab bars, built-in seating, and shelving
- Connect showerheads and plumbing
- Seal edges to prevent leaks
Walk-In Tub Installation:
- Place tub securely on subfloor
- Connect water supply and drain
- Install seating, grab bars, and controls
- Test for leaks and proper function
Most pre-fabricated accessible units can be installed within 1–2 days, minimizing disruption to your home.
Step 7: Finishing Touches
After the main installation is complete, finishing touches complete your accessible bathroom:
- Sealing: Apply caulk or sealant around edges and fixtures to prevent leaks
- Fixture Installation: Mount towel racks, mirrors, and other accessories within easy reach
- Final Testing: Test all plumbing, drains, and accessibility features for safety
- Cleanup: Remove debris and ensure the space is safe and ready for use
Attention to detail during finishing ensures your bathroom is functional, safe, and attractive.
Step 8: Post-Remodel Considerations
After your accessible remodel, there are a few key considerations to ensure long-term functionality:
- Regular Maintenance: Keep drains clear, inspect seals, and clean non-slip surfaces regularly.
- Accessibility Adjustments: Grab bars and seating may need repositioning over time to match changing needs.
- Future-Proofing: Plan for potential additional upgrades as mobility needs evolve.
A well-maintained accessible bathroom provides years of safety and comfort.
Common Benefits of an Accessible Bathroom Remodel
Remodeling your bathroom for accessibility offers numerous benefits:
- Safety: Reduces risk of slips, falls, and injuries.
- Independence: Allows seniors or individuals with limited mobility to shower without assistance.
- Comfort: Built-in seating, handheld showerheads, and non-slip surfaces enhance usability.
- Style: Modern accessible bathrooms combine functionality with aesthetic appeal.
- Home Value: Accessible bathrooms are attractive to a broad range of buyers, increasing resale value.
Pitfalls to Avoid During an Accessible Remodel
Even small oversights can compromise safety and efficiency. Avoid these mistakes:
- Ignoring Proper Drain Placement: Incorrect slope or drain location can cause flooding.
- Skipping Professional Installation: DIY may lead to leaks, uneven surfaces, or safety hazards.
- Neglecting Accessibility Features: Forgetting grab bars or seating defeats the purpose.
- Choosing the Wrong Size Unit: Cramped showers or tubs limit usability.
A professional contractor ensures your remodel is safe, compliant, and tailored to your needs.
The Five Star Bath Solutions Advantage
For Central New Jersey homeowners, Five Star Bath Solutions specializes in accessible bathroom remodeling, including tub-to-shower conversions, walk-in tubs, and barrier-free designs. Key benefits of working with our team include:
- Expert Planning: Accurate measurements and layouts for maximum accessibility
- Fast Installation: Pre-fab units can be installed in 1–2 days
- Permit Guidance: We ensure compliance with NJ codes, especially when drain relocation is involved
- Safety-Focused Upgrades: Grab bars, built-in seating, low-threshold showers, and non-slip surfaces
- High-Quality Materials: Durable acrylic, fiberglass, tile, and stone options tailored to your needs
Serving towns like Edison, Trenton, Marlton, Piscataway, and surrounding Central NJ areas, we help homeowners achieve safe, stylish, and functional bathrooms.
Final Thoughts
Remodeling a bathroom for accessibility is a step-by-step process that requires careful planning, professional expertise, and attention to detail. From initial assessment and design to demolition, plumbing, installation, and finishing touches, each stage plays a crucial role in creating a safe, functional, and beautiful space.
Key takeaways for a successful remodel:
- Assess your space and user needs carefully
- Select appropriate materials and accessibility features
- Work with experienced professionals to ensure code compliance and safety
- Plan for fast, efficient installation to minimize disruption
- Include long-term considerations for maintenance and usability
By following this process, homeowners in Central NJ can enjoy a modern, accessible bathroom that enhances independence, safety, and comfort—whether for seniors, individuals with mobility challenges, or anyone looking to future-proof their home.
If you’re ready to upgrade your bathroom, Five Star Bath Solutions can guide you through every step of the accessible remodel process, ensuring a safe, stylish, and functional space for years to come.